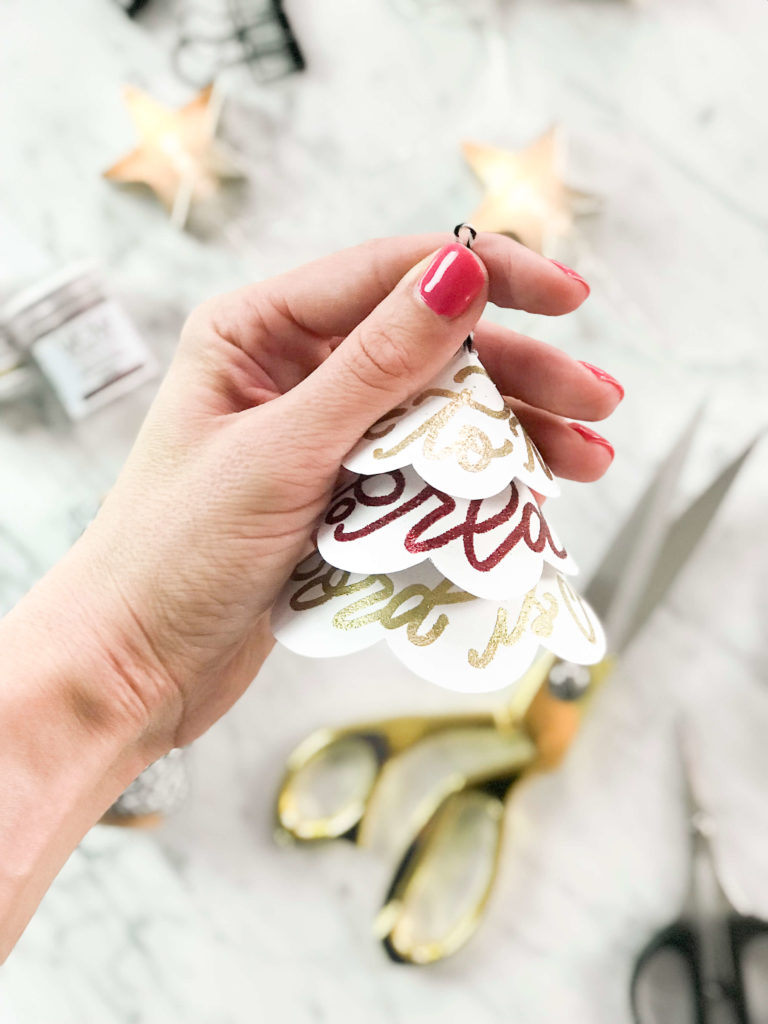
I think every family has the same routine when it comes to Christmas tree decorating…the pretty ornaments (a.k.a. the store bought ones) get hung front and centre, while the handmade “only a mother would love” ornaments get (lovingly) hidden hung at the back. Today, I am happy to share with you this DIY, step-by-step tutorial where I teach you how to make your own handmade, hand lettered and embossed paper Christmas ornaments that, while handmade, are fit to be proudly displayed on the front of the tree.
Whenever my siblings and I help our parents decorate the family Christmas tree, we always get a good laugh that our old handmade ornaments still get hauled out of storage and hung on the tree. Most of these ornaments are circa the 1980’s (Sorry for outing our ages, siblings!), were likely crafted in Sunday School and includes one ornament that is affectionately referred to as “Mr. Hankey the Christmas Poo” (but is actually supposed to be a popsicle stick angel). Every year, without fail, at least one of us will say “This is so embarrassing! Why do you still have these!?” and my parents will explain that they love these (ugly) ornaments, declare that they will never get rid of them and we are then directed to “just stick them on the back of the tree.”
With the help of the free, printable patterns and video tutorial below, get ready to create your own, non-embarrassing, handmade ornaments – either to hang front and center on your own tree or on someone else’s!
Just scroll down to download your free printable ornament patterns and to watch the video tutorial where I show you how to make your own handmade ornaments.
Happy ornament making!!
MATERIALS:
- Your free printable ornament patterns printed on heavy weight cardstock
- Aleene’s tacky glue (suggested) or a glue stick
- Scotch Tape
- Baker’s Twine
- Scissors
- Embossing powder
- Embossing pens
- Embossing heat tool
- Q-tips or a dry paintbrush
HOW TO:
- Print ornament pattern on to heavy weight cardstock
- Trace over the design (any areas that you want embossed) with your embossing pen
- Sprinkle your embossing powder over your embossing pen’s lines while the pen’s ink is still wet
- Lightly shake the excess embossing powder from your design on to another piece of paper (extras can be *carefully* sifted back in to the embossing powder jar) and give your pattern a final gentle tap to remove the excess powder
- If there is embossing powder outside of the design, wipe off the excess with a paintbrush or Q-tip
- Repeat the embossing pen and powder steps, above, in a different color if you want until the design is covered with embossing powder
- Use your embossing heat tool to set embossing powder until your entire design is melted and set
- Cut out the three layers of the tree from the pattern, cutting just inside of the black lines
- Place some glue on to the end of each layer where there is no design, stopping just before the dotted line
- Circle each layer in to a cone shape, overlapping the glue section underneath the other scalloped end, matching the scallops
- Tape the ends in place on the inside of the cone for extra reinforcement
- Trim any overlapping edges with your scissors
- Cut approximately 2 feet of twine and wrap a small piece of tape tightly around each end
- Cut a very small hole at the tip of each cone
- Thread both ends of the twine down the top of the smallest, top cone and even out twine, leaving a looped section to hang the ornament at the top of the smallest cone
- Attach an object (i.e. scissors) to the top of your twine to keep the twine and your ornament anchored
- Turn your top cone upside down and double knot the twine underneath this layer, to stop the twine from being pulled out of the top of the ornament
- Thread both ends through the second, medium sized cone
- Place your second cone at a desired distance from the first cone and double knot the twine as close to the top of the underside of the second cone as possible
- Repeat the above step for the last, and largest cone
- Hold up your ornament and adjust the distances between the layers as needed
- Remove the anchor from the top or your ornament and trim the excess twine at the bottom of your ornament (keeping about an inch after your last knot – just a little “in case of emergency” twine should be left behind)
Watch the full video tutorial here!
TIPS & TRICKS:
- Don’t spill your embossing powder like me! (oops!)
- Remove excess embossing powder while it is still dry – once it is heated, it will set and be part of your final design
- Use the end of your paintbrush to help you get your twine knots as close to the underside of each layer as possible
- Use the blank tracer to personalize the design for friends or family! Make it yours!
CLICK ON THE IMAGE BELOW TO GET YOUR PAPER CHRISTMAS ORNAMENT PATTERNS NOW!


I'm going to assume that you're here because you love calligraphy, hand lettering and art... or maybe you just want to know more about it. Either way, you're totally in the right place!
xo
Amanda


Join over 5000 others who have learned to letter (and more) with these lettering courses
