We’ve all been there. You’ve researched, asked questions and finally pulled the trigger on your first order of pens so that you too can learn hand lettering and they have arrived. The heavens have parted, a ray of sun is shining down directly on your doorstep as you hold the box above your head victorious. Now you too will be able to create and post gorgeously lettered designs on your Instagram feed. You will make all of your own cards. You will hand-letter your wedding vows. Not one piece of art in your home will be created by anyone other than you.
But wait! It’s not just having the right pens that makes the difference, the right paper is just as important for your finished product (and maybe even more so!).
So back away from your pens and read this post because the information here will help your pens to last longer, stay in great condition and perform their best for you for as long as possible.
THE LIFE OF A PEN
First of all, you need to realize that pens are consumable items. Just like pencils, that you have to sharpen and you can see growing smaller and smaller, the ink inside the pens is a finite thing. These pens won’t last you forever, but they can last for longer than you think. On average, I go through one pen a month. (This number is based on the pens that I recommend. For more about what pens to use, check out this post here. If we’re talking about Brush Tip Sharpies, I go through at least one pen with every project that I use it for.).
When I started hand lettering, I saw everyone talking about how you can just use regular printer paper for your lettering and I won’t call those people liars. You can use regular printer paper but your ink won’t last as long and the tips of your pens will fray (this is especially true in the case of Tombow Dual Brush Markers or Faber-Castell brush markers). Here’s why…
It’s all about the paper.
PAPER DIFFERENCES
Each type of paper that you use is different. Sometimes you can even feel a difference between different papers simply by running your hand over the surface of the paper. Some paper is more textured or more grainy and other paper feels smoother. If you are the pen, those differences are multiplied ten fold.
When I was thinking about how to best describe what is happening, I was driving my car and I realized that a car analogy would fit perfectly. Just go with me on this and, don’t worry, I will never give you car advice! So, imagine that your car is the pen. When it writes over the rough or bumpy paper, it is just like driving over a logging road or a road littered with potholes. You’re getting bumped around, heaven only knows what is happening to your suspension and you may end up with a flat tire. It’s the same for your pen nib.
Now you’re driving through a field of trees (you’re a crazy driver!). The tree branches are scraping up against the side of your car. You can hear the high pitched scream of the tips as they drag over your pristine paint job. By the time you get to the other side of the tree field, the outside of your car is scraped up and there are paint curls hanging off of it. This exact thing happens to your pen nib when you write on paper that has any sort of long, threadlike paper fibres.
Paper fibres? What are you talking about? I just use regular paper, not textured paper!
If you just thought that, think again!
WHY DO FIBRES MATTER?
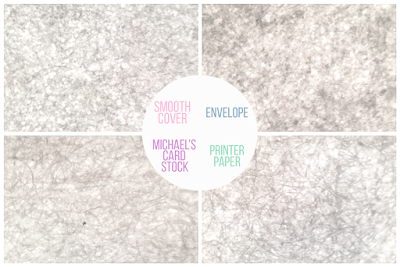
I’m assuming that we all know that paper is made of trees. Those mashed up trees are processed in different ways to create paper. I got all super scientific and decided to put my university degree to use by checking out the paper in my house under a light microscope and here is what I found.
While you can see fibres in each of them, the fibre types are different.
I looked at the 4 different papers that I use or have used in the past. When I started, I would use plain printer paper (bottom right). I even went out and got the “nice” stuff. But my pens would scratch and skip across the page. It was awful.
I figured I would step it up a notch and I used my Michael’s card stock that came in packs of 25 or 50 (bottom left), but the same sort of thing happened and I was getting really discouraged.
When I wrote on my envelopes, it seemed alright, but after doing many envelopes (top right) in a row, my pens would start to fray.
I remembered a paper sample that a printer had sent me and he had labelled the different pages with their paper finish type. It was a bit of a Goldilocks situation. The glossy paper was too glossy and the ink smeared over the surface, the matte paper sucked at the pen but the “smooth” paper was just right (top left). I started to wonder about what “smooth” meant for paper because I assumed that all of my paper was smooth. Yet, I ran my fingers across the surface of the paper and I could feel a difference!
WHAT IS SMOOTH PAPER?
When paper is made, the paper fibres are blended up and then pressed into sheets of paper. Sometimes a texture is added (for linen paper) or a coating is placed over it (for glossy paper). With smooth paper, the fibres are not as long or as coarse and it is pressed through another machine while it is drying. This causes it to have less “tooth.” Tooth is the amount of roughness that a paper has. While the difference in tooth might be negligible to the touch, the difference on your pen is massive!
To get back to my super scientific research with the microscope, if you look through the different quadrants, you can see varying degrees of long, threadlike fibres and, to continue along in the dental vein, these fibres are like sharp teeth tearing into your pens. They will slowly pull apart the felt tip of your pen, causing there to be frayed areas on your nib which will ruin the perfect lines that you need to create stunning brush lettering.
Smooth paper on the other hand, doesn’t have those long fibres, which will help to keep your nibs intact for much, much longer.
When I figured out (through some expensive trial and error) how much longer my pens would last if I only used smooth paper, I got rid of all of my printer paper and my packs of paper from Michael’s and went hunting for high quality smooth heavy weight paper. I went for heavy weight because I knew how much nicer is it to get a piece of art on heavy card versus having art given to you on a piece of paper that could have been grabbed off of your desk! And I found what I thought was the perfect solution – packs of smooth finish card stock at Staples. It was affordable, made my pens last and I could pop down to the store and grab it easily. Yay!! Now I would tell you all to go out and get that but I want to add one more point to consider.
PAPER PURPOSE
Answer this question: Do you plan to keep what you are making or are you going to throw it away?
Unless you want to place it in the recycling bin, you absolutely must get smooth, acid-free, archival safe paper. That’s why I had bought the paper from Michaels! I knew that acid-free, archival paper would last without getting yellow over time and I wanted what I created to look beautiful even years from now. That Staples paper is NOT acid-free. I searched and searched and finally found smooth acid-free, archival paper that I could buy to create all of my designs on. It is so heavy weight that it even works nicely with my Dr Ph Martin watercolours and has the smooth finish that I need for my pens to last and flow wonderfully. The only downside is that it comes as 11″x17″ sheets. But do you know what one 11″x17″ sheet turns into when it’s cut in half? Two 8.5″x11″ sheets!! What?! It’s like it was meant to be!
So now that I have shared my journey, I will share my treasure. Here is the paper that I use for all of my finished pieces. Every time. All the time.
Lynx FSC – Certified Cover Stock Smooth Finish, 11″x17″, 250 pack. I’ll make it even easier for you and give you links to the paper as well.
In the States, you can get it here.
In Canada, order yours from Staples here.
WARNING!
Now, you should be warned that my pens also might last a long time because I don’t always use them. I do a lot of lettering practice with a pencil (a lot!) and I also use some other techniques that I will tell you about next time.
Until then, happy writing!
xo
Amanda
8 Comments

I'm going to assume that you're here because you love calligraphy, hand lettering and art... or maybe you just want to know more about it. Either way, you're totally in the right place!
xo
Amanda


Join over 5000 others who have learned to letter (and more) with these lettering courses


Thank you for this post!! Just one question–how do you transfer your artwork to heavy paper like this? Can you use a light pad or is the paper too heavy to see through?
Thanks Amanda! I have the same question as Michelle above. I am about to purchase a light box and was wondering if I will be able to see my design below. Thanks!
Hi Michelle,
Great question! As long as the paper is white and your sketch below is inked in black or some other dark colour, it will absolutely still work with a light pad!
I'm asking for a new lightpad for Christmas! Which one are you getting? The heavy weight cardstock, as long as it's not a dark colour, will totally be fine to use.
I have a question… If you ever do watercolor/ink hand lettering combo pieces, will this paper handle the water colors well? Those are my favorite pieces to do but I'm having a hard time finding good paper that won't curl even if it's deemed "watercolor" paper
[…] Paper Matters I recommend pens all the time and people go buy them, but paper is even more important than pens! It keeps them, and your final products, in amazing condition. […]
What kind of notebooks do you recommend for practice? Like the ones I see in your IG feed?
Thanks!
I just got some Wausau Exact Index Cardstock, 110 lb/199 gsm Index, and it also comes in 90 lb/163 gsm Index. This is the smoothest paper I have ever felt. I got it on Amazon. It is acid & lignin free. It is really, really nice.