 Yep. That’s a super weird blog title. But it’s the truth! A single piece of foam core can be the most powerful lighting trick that you use to take the photos of your hand lettering pieces to the next level. So pop on down to the Dollar Store and get a piece or two right now.
Now, here’s the real question, how exactly do you use that foam core?
Most of us don’t have a huge area that gets light from each side that is just perfect for taking your photos. And if you do, read no further. But if you’re like me, you get your best photos with the one nice big window in your house on a cloud filled day so it’s bright but not directly in the sun.
Living up in Canada, I’ve found winter photography to be even more challenging. The hours are short, the bright isn’t quite as bright as it used to be and my photos would appear dull and dark. Not the look I’m going for.
In the summer, the light is great, but it still only comes from the one side. This leaves a gradient across my photo – one side is bright (because it is the side next to the window) and the other side has a slight shadow (because it is on the side away from the window). You can also see the the bumps and ripples of the paper are much more evident as well! (This is not good when you have a toddler who loves to grab for everything and crumple it up faster than you can yell, “Unhand that!”)
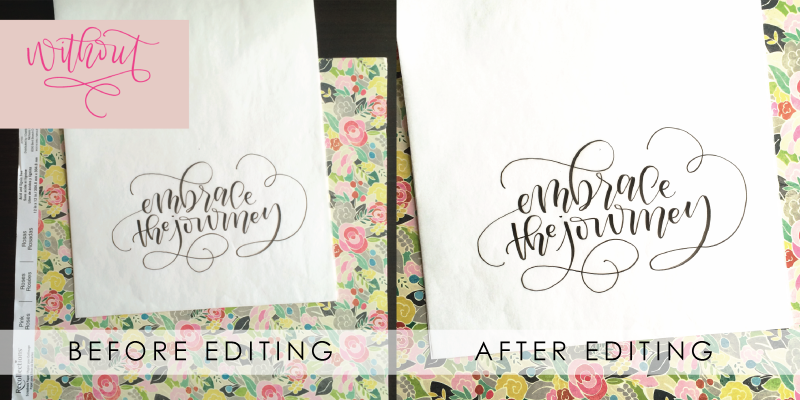
Now the effect might not be super obvious to the naked eye, but when you go to edit your photo, it magnifies the lighting difference. Foam core to the rescue!
The photo above is the edited version of the photo taken without the foam core and the edited photo below is using the photo that got the foam core treatment. A huge difference!!
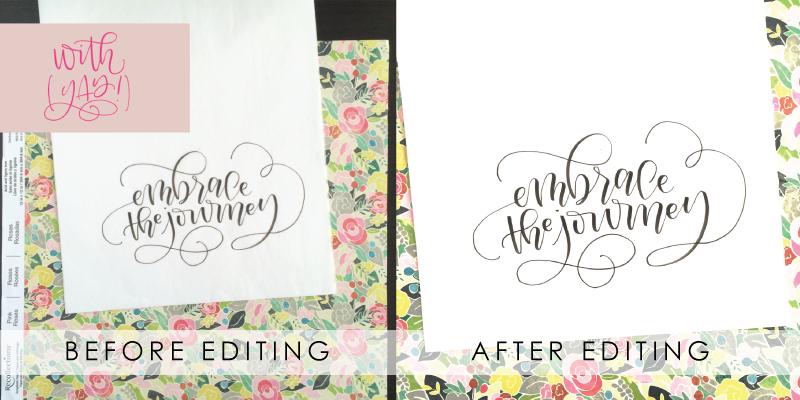
Because of its large white area, placing the foam core on its edge on the dark side of your paper allows the light to bounce off of the foam core and light up that pesky dark side. Here’s what I mean….
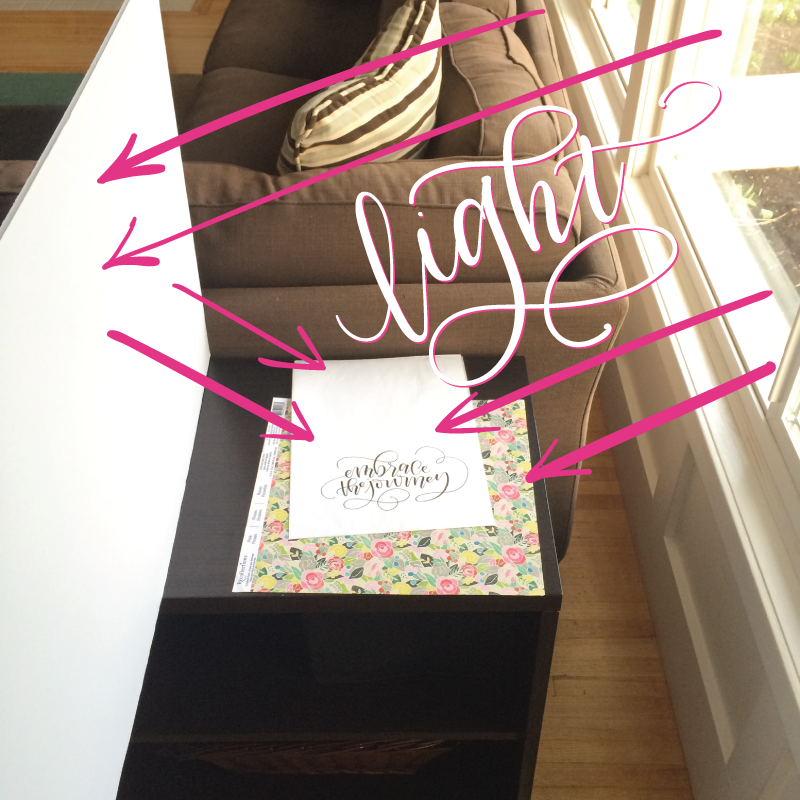
I stand in front of whatever I’m shooting, with the window on one side (if you’re in front of the window, you’ll create a shadow and you want all the light you can get!). With my right hand I get Camera+ ready to go with an exposure of +0.7 and a square crop. With my other hand (this takes great skill and focus for someone as incredibly uncoordinated as myself), I hold the foam core beside my lettering. The white of the foam core bounces the light back onto the left side of my lettering and I end up with perfect, even lighting.
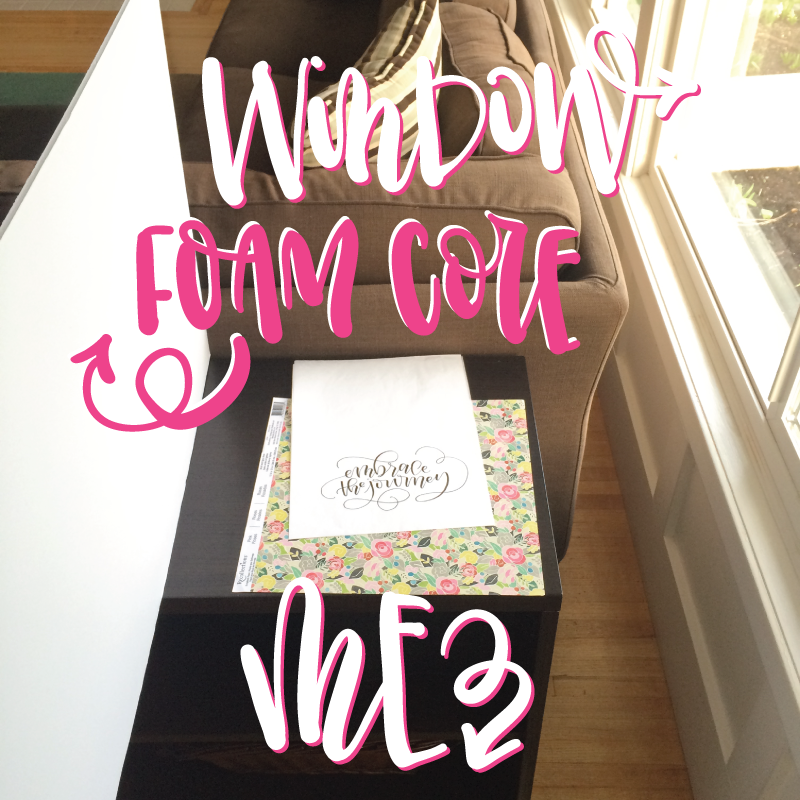
This trick is a little thing that makes a huge difference! When I’m done taking my photos, I slip the foam core under my couch until I need it again. Easy peasy!!
Foam core is the cheapest and most important trick that you can use for your lettering photography!
26 Comments

I'm going to assume that you're here because you love calligraphy, hand lettering and art... or maybe you just want to know more about it. Either way, you're totally in the right place!
xo
Amanda


Join over 5000 others who have learned to letter (and more) with these lettering courses

Thanks for being so generous with all your tips, Amanda!
My pleasure!!
Thank you for the visual! I can not tell you how much I have enjoyed your emails. They are just enough information to encourage me to keep practicing. Your work is beautiful and I love seeing what your little ones have to say.
I’m so glad that you find them helpful! There’s a bunch more good stuff that I have in the brain vault of mine, so get ready for more!!
xo
Brilliant trick!
This is a great idea for lighting (& affordable which is also great). Thanks for all the great tips!
The affordable ones are always the best!!
THANK YOU!!!!!!!!!!! Thank you for illustrating exactly how to get those amazing photos!!!
No problem!! Great photos make all the difference!
I am loving my Lettering Course and really trying not to get frustrated. It does take PRACTICE as you told us. Love your emails with all the tips. Thanks for being so generous with all your experience and expertise!
Rhona Harkness
You are the sweetest!! Just keep taking it slow and you’ll get there!
xo
That is a wonderful tip. Thank you for sharing it.
You’re absolutely welcome!
Oh how I love receiving your emails! Your photo explanation of where to place the foam core is brilliant. I finally get it. I’ve also heard placing a few florist frogs at the bottom of the foam core can help hold it up, and act as your third arm! Thanks again Amanda.
That’s a great idea!! Usually I just use my daughter but she’s a bit unpredictable 😉
Thank you for all your tips! They sure do help a newbie such as myself:)
Thanks for being kind like Cinderella Amanda. I’m so grateful 🙂
Great trick thank you. What is the font used in this example. Its beautiful
It’s just my hand lettering 🙂
Thank you so much, Amanda, for the visual tutorial! It can be quite hard to follow written instructions when you have no visual. I love the pink arrows that you doodled on your photo! Perfection! For me, they shouted out,” You’re not the only one who needs this style of teaching!” Loving your style!
Wow!! Love this! Thank you!
o my gosh! thank you so much for this tip… this is gonna solve my problems with taking photos of my scrapbook layouts. i live in Alaska where winter days are short too. and it gets frustrating at times. YES! thank you again!
Brilliant! I’ve tried a couple other photo tips that I’ve found online, but this one is simple and fantastic! Thank you so much for sharing your tricks of the trade with us all…I’ve been thoroughly enjoying them. 🙂
No problem! I love being able to share these simple quick hacks to make us all look even more awesome.
xo
Amanda
Thank you!! Just found your site today (Instagram) because you were shareimg the pen(s) you use . . . I think you are going to be my new best friend!
Sounds good to me!! Best friends it is!
xo
Amanda